Insane Hydraulics
Bold and audacious blog about fluid power
Today I want to go into pump repairs and talk about a wear pattern that can "fool you" if you're not careful when you are inspecting pump parts, and also tell you a story of how I "got caught" by it and had to rebuild the same unit twice.
If there's one thing I don't like, it's the so-called "emergencies" - i.e. situations when a client shows up saying that if his pump is not repaired that very second the whole world will come to an end! And the main reason why I don't like them is that when I rush repairs I make mistakes, and mistakes with hydraulics are painful and expensive.
So, that time I got a Rexroth closed-loop transmission from a Deere's 1110 forwarder, that would constantly set off the low charge pressure alarm. Same old same old. I had done hundreds of these before. I quickly disassembled both the pump (A4VG125) and the motor (A6VM160), promptly made the list of necessary parts, and sent the quote to the client.
If you ever worked with pump overhauls, I am sure that you know the feeling when you look at a part, and see that it's "facing a midlife crisis" - meaning it's definitely not new, but still not ready to be scrapped either. A new part is always technically better, of course, but since most pump parts carry high price tags, my practice for such situations is to talk to the client, and if he is short on cash - advise that he could re-use the part/parts, but should expect a shorter lifetime, and schedule an overhaul as soon as the "cows stop being skinny" (as they say here in Portugal).
That time wasn't different, and as I was inspecting the cylinder block of the pump, it kind of looked OK, and so I decided to lap it instead of replacing it to help the client save a decent amount of euros. I confess that since I was in a hurry to deliver the overhaul, I didn't spend much time inspecting the cylinder block - I checked the lens surface, which looked OK - and that was it! Nothing a bit of lapping paste and a steady hand couldn't fix.
Got the parts the next day, put the units together, gave them a quick run in our simple bench, and shipped them out, pretty pleased with myself.
"Simple bench," say you? Let me explain. It so happens that I still don't have a proper pump testing stand in the shop I'm currently at. Yep! I do pump repairs, but I don't test pumps as pumps. Our "good" test bench is in Lisbon - so when I need to, I simply sent the units there, which takes two or three days. But when it's an emergency I can't do that, and so I have a set of "techniques", so to speak, that I developed to test pumps using my "normal" test stand while running them as motors.
This is definitely not ideal, but I would say that in 95% of cases such tests are "surprisingly enough" to be "almost" sure that a unit is fine. I know that 95 percent is not a hundred, but it's "emergencies only", OK? If you ever faced "industrial pressure" I'm sure you can relate. At least you get to check if the unit has external leaks, abnormal noises, displacement shift, and very often the internal leakage as well. Some piece of mind is better than none, right?
Everything in my simple test pointed that the pump I rebuilt was OK. However the next day I got a call from the mechanic who installed the transmission saying that it seemed to be working, but when the transmission pressure hit 420 bar the charge dropped to 16, and he asked me if it was normal.
Yeah... A charge pressure dropping like that is the last thing you want to hear about a transmission that you just rebuilt! But the fact remained - it's busted, obviously, so now I had to figure out how bad.
So, I went to the machine, and the first thing that I did was check the motor leakage. I imagine that at this point some of you may say something like "Dude, you can't do that on a closed-loop motor with flushing!'" Hold your horses, lads, let the "pro" explain - I blocked the flushing spool with a couple of spacers that I have for most motor models that I work on, and then checked the leakage at 420 bar (the highest pressure the pump could dish out).


The reason I went for the motor first was simple - I already knew I was screwed, I just wanted to confirm if I was double-screwed because removing the transmission pump from an 1110 is (relatively) easy, however removing the motor is a much more painful exercise because it sits right under the open-loop DCV, that has a million hoses connected to it and that has to come out to get to the motor.
The motor leakage was negligible, so at least half of my overhaul went right, so I removed the pump and took it back to the shop.
My subconsciousness already told me what it was though because I remembered that when I was inspecting the barrel the first time, a "silent alarm" went off in the back of my mind. Yes, the lens surface looked OK and all, but there was something that didn't "feel right" about it...
And, of course, as soon as I took the unit apart for the second time and looked at the barrel with seeing eyes - I immediately saw where the problem was, and in fact, it was something that I had already seen countless times before - the excessive play in the barrel sleeves!


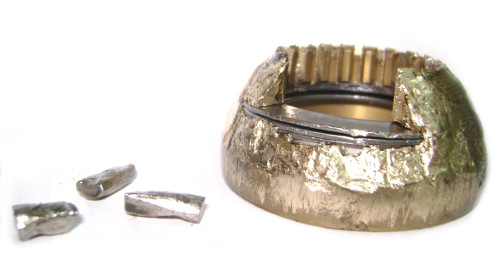
You can kind of see it in this picture, where I put new and old parts side by side. I am referring to the wider gap between the piston and the sleeve. The sleeves can be pretty worn out, and still, look OK, so if you don't check the play, you can let it slip and then face a perfectly avoidable warranty claim. I guess - shame on me!
In that particular case, I should have been more careful, because I did find the shaft bearing on the verge of breaking. There were small chunks of material already missing from the outer race, and the scratches on the piston slippers gave me a clear indication that hard particle contamination of the case oil was occurring, and when this happens - the case-facing ends of the barrel sleeves tend to suffer additional wear as the particles suspended in oil get drawn in the piston/sleeve clearance.
The piston sides also had scratched surfaces, which should have forced me to pay additional attention to the sleeve wear - but the haste made me blind!
It is interesting to note that the pistons themselves, even scratched, didn't lose any of their diameters. Here's a new vs used piston, they both have piratically identical widths.


The solution? Two hours driving to Lisbon to get new parts, two hours driving back, re-lapping and double-checking everything, and voila - the unit is back together again and it's not even midnight! The next day it's back in the forwarder, we set the relieves at 480 and the cut-off at 440, with the charge perfectly stable at all times, and I go back home and sleep like a baby!
There's one question that needs answering though. Why didn't my "simple" test show excessive leakage then? I had a flow meter in the case line, and I did pressurize both of the pump ports to 400 bar, and didn't catch too much leakage, so what went wrong here?
I have a theory. I didn't write it down, but if I recall correctly, I registered something like 5 liters per minute at 400 bar, which seemed OK for a 125 cc unit. But that was the leakage with the swash plate at zero degrees. I believe that the barrel sleeves had a tapered wear pattern, and so the piston/sleeve assembly leakage would increase greatly when the swash plate was tilted - i.e. when half of the pistons were in an extended position.
Anyhow - to the lessons: